 upfix.com
 888-979-9343

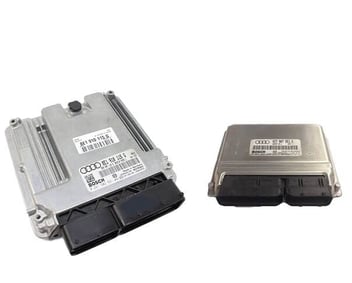
Removing an electronic unit from your vehicle might seem simple, but it’s a task that must be handled with great care. Incorrect removal can cause more harm than good and may even damage your vehicle’s electrical system. Whether you're dealing with an ECU, ABS module, instrument cluster, or radio, understanding the correct process is essential. With UpFix’s guidance, you'll know how to safely remove your unit and why our services are the right choice for reliable and expert repair. This article will walk you through the proper tools, detailed removal steps, key safety precautions, and post-removal tips. It will also showcase UpFix’s industry-leading expertise in automotive repair services, covering everything from ECUs to HVAC circuit boards. If you're dealing with a faulty ECU Engine Control unit, don't worry—help is a click away. Reach out to UpFix now for professional ECU repair services and get your vehicle back on the road faster.
Tools and Materials You’ll Need
Before beginning the removal, make sure you have all the necessary tools on hand. The right tools not only speed up the job but also prevent damage to your vehicle’s sensitive components. Safety and organization are also critical throughout this process.
Preparation makes the difference between a successful removal and a costly mistake. Here’s a list of essential items you’ll need:
- Flathead and Phillips screwdrivers – For removing different types of screws found in paneling and housings.
- Panel removal tool or trim pry tools – To safely pry off plastic panels without breaking clips.
- Socket wrench set – Needed for unbolting modules from their mounts.
- Static discharge strap (recommended) – Protects sensitive electronics from static electricity damage.
- Flashlight and gloves – For visibility in tight spaces and hand protection.
- Camera or phone – For documenting connector locations and panel configurations.
Step-by-Step Instructions for Safe Unit Removal
Removing a module from your vehicle must be done systematically. Rushing through this process increases the risk of damaging connectors, pins, or internal components. Each step should be followed carefully to ensure safety and maintain the unit’s condition for repair.
The following guide will take you through each stage of removal in detail:
Step 1: Disconnect the Battery
Always start by cutting the power. Removing the unit while it's still energized can cause serious problems.
Turn off the vehicle completely and remove the key from the ignition. Disconnect the negative battery terminal to ensure no current flows through the electrical system. This is crucial to prevent short circuits or electrical shocks. Wait approximately 5 to 10 minutes before proceeding to allow any capacitors to discharge. This extra time ensures full system deactivation. Never skip this step—it sets the foundation for safe removal. A minor oversight here can lead to irreversible damage.
Step 2: Identify the Unit Location
Knowing where your specific unit is located will save time and frustration. Modern vehicles often place electronic units in tight or unexpected spots.
Refer to your owner’s manual or repair documentation to find the exact location of the component you’re removing. Common placements include under the dashboard, behind the glove compartment, beneath seats, or within the engine bay. Understanding its placement helps you plan disassembly better. Identify any panels, fasteners, or parts that obstruct access. If necessary, mark or take photos of the surroundings for easy reassembly. Some luxury vehicles hide units deep within intricate paneling. Patience and awareness are essential to avoid broken clips or scratched surfaces.
Step 3: Remove Interior Panels or Covers
You must remove trim or panels that conceal the electronic unit. This part requires careful handling to avoid damaging interior components.
Use the panel removal tool to gently pry off plastic covers or trim. Never force or yank pieces, especially if clips are hidden or firm. Unscrew all visible fasteners using the correct screwdriver type. For complex assemblies, record your progress with photos. Carefully place removed panels in a safe spot to avoid stepping on or losing them. If you encounter resistance, double-check for hidden screws or latches. Taking your time at this stage avoids costly cosmetic repairs. It also keeps your vehicle looking clean and professional once the job is done.
Step 4: Disconnect Connectors Carefully
Electrical connectors are delicate and often locked in place. Mishandling these can cause broken tabs, bent pins, or frayed wiring.
Examine each connector closely to determine how it locks in place. Press or slide the locking mechanism before attempting to remove it. Never yank a connector by its wires—always grip the plug itself. If access is tight or visibility is low, use gloves and a flashlight. Label connectors or take photos to ensure accurate reinstallation. When dealing with multiple cables, organization becomes critical. Be mindful of static and keep your discharge strap grounded. This prevents accidental damage to sensitive circuit boards inside the unit.
Step 5: Unbolt and Remove the Unit
Now that the connectors are unplugged, you can proceed to remove the unit itself. Handle it with care to avoid damaging its housing or internals.
Use your socket set to loosen and remove all mounting bolts or screws. Depending on the unit, you may find brackets or clips holding it in place. Slide the unit out slowly, avoiding twisting or angling that could harm connectors. Once removed, store it in a static-safe bag or cushioned container. Keep it dry and avoid exposure to moisture. This ensures the unit remains in optimal condition for shipping and repair. If you’re sending it to UpFix, include your repair ticket or paperwork for faster processing.
Important Safety Tips
Safety cannot be overstated when handling electronic components. A small mistake can result in shock, damage, or an inoperable vehicle.
The tips below serve as essential guidelines when working with any vehicle module:
- Always disconnect the battery before touching anything electrical.
- Avoid performing work in wet or humid environments where moisture can damage components.
- Wear a static discharge strap to prevent electrostatic discharge.
- Keep all tools organized and avoid mixing screws or clips.
- Label connectors clearly or take reference photos before removal.
- If unsure at any step, consult a professional or service manual.
- Handle the unit by its edges, not the connectors or board surfaces.
- Do not attempt repairs yourself unless properly trained.
Why Removing Your Unit Properly Matters?
Improper removal can do more harm than good. It can trigger further faults, make a unit unrepairable, or complicate diagnostics.
Damaged connector pins, misaligned terminals, or short circuits are common when proper precautions are ignored. Units like the ECU are sensitive to shocks or bending, and beware of these transmission and ECU faults that can arise during DIY removals. Some units may retain charge or settings even after disconnection, so rushing the process is risky. Careless handling can also void warranties or make you liable for further vehicle issues. Taking the time to remove the unit properly ensures it's ready for successful diagnostics and repair. It also improves your chances of reinstalling it without requiring dealer programming. Respect the complexity of modern vehicle electronics.
Why Choose UpFix After You Remove Your Unit?
Choosing the right repair partner after removing your unit is crucial for a smooth and lasting fix. UpFix stands out in the repair industry for its reliability, precision, and certified expertise. From diagnostics to delivery, we maintain strict standards that restore your components to peak condition. Below is a detailed breakdown of why UpFix is the trusted choice for thousands of vehicle owners.
Trusted Repair Services Across Industries
Choosing a skilled repair service ensures your unit is handled with care. UpFix leads the industry in automotive repair service and more. We work with ECUs, HVAC boards, ABS modules, infotainment systems, and instrument clusters. Each technician is IPC-certified and trained to diagnose faults down to the component level. Our services extend to fitness, appliance, and industrial electronics, not just automotive. We’ve repaired thousands of units with high customer satisfaction and precision. That makes us a go-to solution when performance and quality matter. No guesswork—just proven results.
Diagnostic Accuracy and Professional Testing
We don’t just repair—we thoroughly test. Before your unit is returned, it’s run through rigorous OEM-level diagnostics. Our tools and processes identify both surface-level and internal issues. We use advanced imaging, voltage testing, and software scanning tools to ensure accuracy. Once repaired, every unit undergoes final inspection and live simulation testing. This ensures functionality upon reinstallation with no guesswork involved. We take every measure to protect and restore your component. IPC-certified technicians are involved at each stage to ensure consistency.
Transparent Process and Fast Turnaround
Our repair process is clear and efficient. Customers begin by submitting a repair request online and shipping their unit. Once received, we diagnose, repair, test, and return it quickly. Typical turnaround is between 2–5 business days, depending on the issue. We provide real-time tracking updates for every repair. With transparent pricing and clear communication, we eliminate surprises. We also maintain full documentation for every job. Our process is designed with customer trust and ease in mind.
Proven Cost Savings and Customer Impact
With over $314 million saved for customers, UpFix’s impact is real. Many clients avoid costly dealer replacements by choosing our service. Reviews highlight convenience, fast service, and restored performance. Customers frequently return for additional repairs after a successful experience. Whether it's a car module or treadmill board, we deliver value. Each repair also comes with warranty support for added confidence. Our goal is to extend the life of your device—not sell you a new one. Reach out to UpFix today for ECU Engine Control repairs and discover a smarter, more affordable alternative to full replacement.
UpFix 4-Step Repair Process
We’ve streamlined our repair services to make your experience seamless and stress-free. Every step is designed for accuracy, safety, and satisfaction.
Here’s how our proven process works:
- Step 1: Submit your online request and ship your unit to UpFix.
- Step 2: We conduct a full diagnostic scan and isolate faults.
- Step 3: A certified technician repairs or replaces defective components.
- Step 4: We test and verify performance before shipping it back.
Turnaround times range from 2 to 5 business days depending on the issue. In most cases, there’s no reprogramming needed after reinstallation.
Case Study – Instrument Cluster Removal and Repair
Let’s look at a real-world example. This case highlights the value of proper removal and UpFix’s repair expertise.
Vehicle: Chevrolet Silverado
Problem: The customer reported a dead speedometer and intermittent backlight issues. The unit was completely non-functional at times.
Process: The vehicle owner followed our online removal guide, disconnecting the battery and carefully removing trim panels. They labeled each connector and shipped the unit securely to our lab. Once received, we diagnosed the problem as a failed stepper motor and burnt-out backlight capacitors.
Result: We repaired and tested the unit within 48 hours. The customer reinstalled the unit and confirmed full functionality—no dealer programming required. The savings and convenience compared to dealership replacement were significant.
Customer Reviews and Testimonials
Hearing from other customers can help you understand the real-world value of UpFix’s services. We’ve received thousands of positive reviews from clients across industries and vehicle types. Their stories reflect the trust, satisfaction, and savings they experienced firsthand. Below is a glimpse of what UpFix customers are saying after successful repairs.
5/18/2025

Great customer service and quick response on warranty, will recommend 💯%
5/8/2025

I am very happy with your services on my repairs.
-Bruce A.
5/1/2025

Fantastic service and communication at a very reasonable price!
-Daniel
Expert Tips for Reinstallation
Reinstalling your unit is just as critical as the removal. Skipping checks or rushing this phase can undo all your effort. Make sure all connectors are securely reattached. Loose pins or partial engagement can cause intermittent issues. Align the unit with all mounting points before tightening bolts. Over-tightening can warp the housing or damage threads. Reconnect the battery only once you’ve confirmed all hardware and plugs are secured. Start the vehicle and immediately test the component’s functionality. If warning lights appear, double-check connections or consult support. Reinstallation is the final checkpoint before a successful repair cycle.
Frequently Asked Questions
Understanding the repair and reinstallation process helps eliminate surprises. This section answers vehicle owners' most common questions after removing or sending their unit. It clarifies power disconnection, reprogramming, and repair timelines. Read on to gain clarity before, during, and after your repair with UpFix.
- Do I need to remove the battery before unplugging my unit? Yes, always disconnect the battery to avoid shocks and prevent damage.
- Can I reinstall the unit myself? Yes, follow your disassembly steps in reverse. Be careful with connectors and alignment.
- Will I need to reprogram the unit after repair? Most units retain programming and are plug-and-play once returned.
- What if I damage a connector or forget where a wire goes? Contact UpFix for guidance. Photos or labels help in these cases.
- How long does the repair take? Typical turnaround is 2 to 5 business days, depending on complexity.
Last Takeaways: Your Vehicle Deserves a Smart Repair Solution
Safe unit removal is the critical first step toward restoring your vehicle’s full performance. Rushing the process or skipping safety measures risks further damage. A structured approach, the right tools, and documentation will set you up for a successful reinstallation later. With your unit safely removed, choose a trusted partner for professional repairs.
UpFix delivers fast, affordable, and reliable solutions across automotive, industrial, fitness, and appliance sectors. With a track record of excellence and IPC-certified workmanship, you’re in good hands. Don’t let faulty electronics sideline your vehicle—let UpFix bring it back to life. From diagnostics to testing, we handle it all. Your journey to restoration starts here.
Ready to Fix Your Vehicle's Electronics? Here's Your Next Step
Don’t let a faulty ECU/ECM put your vehicle’s reliability at risk. UpFix offers expert diagnostics and certified repairs for all major automotive electronics. Our services include fast turnaround, affordable pricing, and real-time repair tracking. Customers nationwide trust us for high-quality, warranty-backed results. Visit our website to explore services, request your repair, or join our community forum. Reach out to UpFix now for ECU Engine Control repair services and experience a seamless, affordable solution backed by experts.